30 Minute Cinnamon Rolls

Family Day is a recently implemented holiday in Ontario, and I’m incredibly grateful for a long weekend smack in the middle of February. J and I have our families close by, and it is the perfect opportunity to get together. Since family gatherings (at least at our house) revolve around food, I was searching for the perfect recipe to make our Family Day breakfast a little more special. Cinnamon rolls were an obvious choice — a great addition to breakfast, totally delicious, and really…who doesn’t need an excuse to eat icing at breakfast?

I’ve got a tried-and-true cinnamon roll recipe that rises overnight, and I had fully planned to bake that up in time for our 9:00 breakfast. Thanks to pregnancy brain and the never-ending all-day nausea, I completely forgot to mix up the dough the night before. So instead, panicked and scrambling on Saturday morning (and not feeling like running to the store for a tube of Pillsbury dough), I searched for an easy, no-rise, half-hour-or-less cinnamon roll recipe. And with some tweaks and adjustments, I came up with the perfect one. If these take you longer than 30 minutes to make AND bake, I’ll buy you a tube of Pillsbury dough just to make up for it.

IMG_5365

Ingredients:
3 cups all-purpose flour
3 tbsp white sugar
1 tbsp baking powder
1/2 tsp baking soda
pinch of salt
2/3 cup cold butter, cut into cubes
1 1/4 cups milk
1 tsp lemon juice
1 egg

Filling:
1/4 cup butter, softened
1/2 cup brown sugar
3 tsp cinnamon

Icing:
1/4 cup cream cheese
1/4 cup butter
2 cups icing sugar
milk

In a large bowl, whisk together flour, sugar, baking powder, baking soda, and salt. With your fingers or a pastry cutter, mix in the butter until the whole mixture resembles coarse crumbs. In a separate bowl, whisk together milk, lemon juice and egg; pour into the dry ingredients and mix together into a soft dough.

Turn this dough out onto a floured surface, and knead 10-15 times. Roll it into a large rectangle. Spread butter over the rectangle, and sprinkle with cinnamon and brown sugar. Starting with a long edge facing away from you, roll the whole thing towards yourself until it resembles one long log. Roll tightly; more rolls means more cinnamon-swirls in the middle. Cut this log into 12 equal pieces. Press each of these rolls, swirl-side up, in a greased 9×13 pan. Bake at 400 degrees for about 15 minutes, or until golden brown.

IMG_5368

While the cinnamon rolls are baking, beat together cream cheese, and butter until smooth. Beat in icing sugar, adding small amounts of milk as needed to thin it out. Icing should be fairly thin, but not thin enough that it will just run off the rolls.

When the rolls come out of the oven, pour icing over the top. Serve warm, or let cool completely, wrap in plastic wrap, and keep in the fridge to reheat another day.

IMG_5371

IMG_5382

10 Minute Salted-Caramel Popcorn

J and I have a wicked sweet tooth, and we’re always on the lookout for new snack ideas. While I’m always game for a batch of chocolate chip cookies or a heaping bowl of ice cream, sometimes I’m craving something a little bit different. I came across this recipe for salted caramel popcorn from Gordon Ramsey, and after seeing the ingredients required (only 6!) and the time needed (10 minutes!), I knew I had to give it a try. And while the instructions might sound a bit complicated, I promise, once you’ve tried it, you’ll be whipping up caramel corn for every occasion.

2 tbsp oil (canola or coconut)
1/3 cup popcorn kernels
1 cup white sugar
1 tsp salt
3 tbsp butter
1 tsp baking soda

In the bottom of a large pot, heat the oil and a few popcorn kernels until the kernels pop (about three minutes or so). Remove the pot from the heat, add the remaining kernels, and place the lid on the pot. Keep the pot off the heat for 30 seconds, then return to the heat and shake vigorously until all of the kernels pop (this will happen quite fast). Pour the popcorn into a bowl and set aside.

Pour sugar and salt into the pot, and let it melt. You can swirl the pot occasionally to keep the sugar from burning, but stirring makes the caramel lumpy. When it is melted and golden brown, take the pot off the heat, and add the butter. The mixture will bubble and boil, but stir until it is fully incorporated and melted together. Add the baking soda and stir; the caramel will fizz and puff up. Pour the popcorn back into the pot, and stir well to coat. Spread coated popcorn out on a baking sheet, and let cool for about a minute. Break up the lumps, dump into a bowl, and devour. Or, package up nicely and give away to your adoring friends and family.

Baking For Babies: Veggie Monster Muffins

As Kennedy starts eating more and more table food (who am I kidding…she never ate baby food), its a real struggle to get vegetables into her. All of our go-to snacks seem to be carb-based; crackers, puffs, MumMums, toast. Its pretty tough to hand a ten-month-old a leaf of lettuce, and she doesn’t seem to like steamed broccoli or any of the standard ‘baby’ vegetables.

So that left me searching for a recipe that 1. she would eat, 2. had lots of vegetables and 3. wasn’t full of sugar. And when I couldn’t find quite what I was looking for, I created a recipe of my own. These ‘monster muffins’ taste like blueberry-banana oatmeal muffins, but they come out bright green (depending on the veggies you add). By labelling them ‘monsters’, I circumvented the inevitable ‘ewwww’ that comes from seeing green baked goods. They’re monsters… they’re SUPPOSED to be green.

Have fun with these – toss in any combination of fruits and vegetables that you like. Each mini muffin is packed full of goodness…and they taste pretty good, too!
20140707-071409-26049624.jpg
Veggie Monster Muffins
(36 mini muffins or 18 standard muffins)

Ingredients:
1 1/2 cups flour
1/2 cup quick oats
3/4 tsp baking soda
1/2 tsp nutmeg
1 tsp cinnamon
1 tsp vanilla extract
3/4 cup sugar
1/4 cup butter
1/4 cup sour cream
2 eggs
2 apples
1 carrot, grated
2 bananas
1 cup blueberries
1 1/2 cups assorted vegetables (kale, spinach, zucchini, broccoli, anything)

Directions:
In a food processor, blender or Magic Bullet, combine vegetables, sliced apples, and bananas. Puree until everything is blended and smooth (a few small chunks are okay, but they’ll be present in the muffins). Set aside.

In the bowl of a mixer, beat together butter and sugar until fluffy. Mix in eggs until fully incorporated. Add vanilla, sour cream, pureed vegetables, and grated carrots, and stir until combined.

In a separate bowl, whisk together flour, oats, spices and baking soda. Stir dry ingredients into wet ingredients. Add blueberries and stir to mix.

Scoop batter into greased or lined mini-muffin tins. These will also bake fine in standard muffin tins, but you will need to increase the baking time. Bake at 375 degrees for about 20 minutes, or until a toothpick comes out clean. Let cool in the pan for 5 minutes, then cool on a rack.

These freeze really well, so make a big batch and just take out a few each day.

Woman, Make Me Dessert: The Fruit Basket Crumble

J is sick with the man-flu. Working with people all day every day means you’re going to get hit with whatever virus is going around…and he got hit pretty hard. So, despite the fact that I’ve just started Weight Watchers (more on that later), when he demanded dessert, I figured I should probably deliver (and let’s face it, I wanted dessert, too).

In case you’re wondering, the correct response to “Woman, make me dessert!” (after the four-letter words are used up) is:
Image
Fruit Basket Crumble

4 cups fruit (I used apple, pear, peach and strawberries)
1 tablespoon white flour
1/3 cup white sugar
1-inch piece of ginger, grated (or 1 tsp ground ginger)

1/2 cup flour
1/2 cup oats
1/2 cup brown sugar
1/2 cup coconut oil
1/2 cup shredded unsweetened coconut

In a greased 9×9 baking pan, mix together fruit, 1 tbsp flour, white sugar and grated ginger. In a separate bowl, mix together flour, oats, brown sugar, coconut oil and coconut until crumbly. Sprinkle over the fruit. Bake at 400 degrees for about 35 minutes, or until the topping is brown and toasty and the fruit is softened.

This would be awesome with ice cream – we didn’t have any in the house, and I wasn’t about to run to the store. But pick some up – it’ll be worth it.

Spring is Coming: Oatmeal Citrus Cream Bars

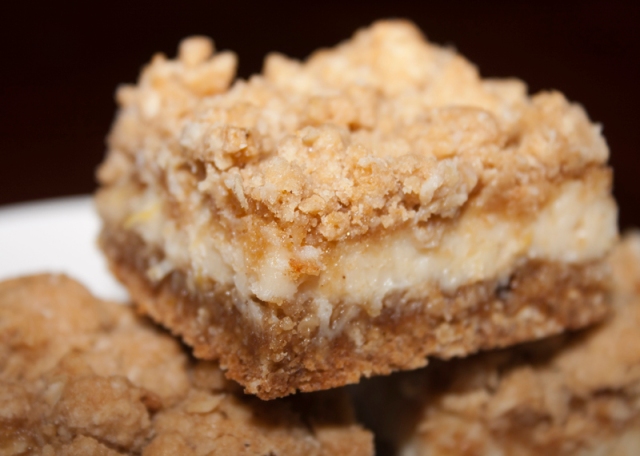
I’ve seen these oatmeal lemon creme bars floating around the Internet lately, and I even devoured a few made by a good friend a few weeks back. There’s just something about tangy lemon, crunchy oatmeal, and sweetened condensed milk that tastes GOOD. They’re a nice departure from the standard lemon square, and I’m always looking for a crowd pleaser.

oatmeal-lemon-creme-bars13

(photo credit)

K’s baby dedication is today, and I whipped these up as part of our dessert table. But, as with every recipe I make, I needed to adapt it a little. Partly because I like to experiment, and partly because I ran out of ingredients. So without further ado…

Oatmeal Citrus-Cream Bars

2 cups flour
1 1/2 cups quick oats
3/4 cup softened butter
1 cup brown sugar
3/4 cup white sugar
2 tsp baking powder
1 tsp salt
2 cans sweetened condensed milk
3 tbsp grated lemon peel (2 lemons)
2 tbsp grated lime peel (2 limes)
1/4 cup lemon juice (2 lemons)
1/4 cup lime juice (2 limes)

In the bowl of a mixer, cream together the butter and sugars until light and fluffy. In a separate bowl, whisk together the flour, oats, baking powder and salt. Add the dry ingredients to the wet ingredients, and mix until crumbly. This mixture should hold together fairly well.

In the bottom of a lined, greased 9×13 pan, press 1/2 of the oatmeal mixture. Bake this base for 15 minutes in a 350 degree oven, or until just browned around the edges.

While the crust is baking, whisk together the condensed milk, lemon & lime peel, and lemon & lime juices. Pour this mixture over the crust (while still hot), and sprinkle the remaining oatmeal mixture over top. Press down slightly, and return to the oven. Bake the bars for an additional 25 minutes. Let cool completely (or better yet, refrigerate) before slicing.

Empty Pantry, Full Belly

Monday was National Chocolate Cake Day. I’d like to think I knew this ahead of time and planned accordingly, but the truth is, I didn’t have a clue until the cupcakes were out of the oven.

Every few days, I get the urge to bake something yummy. Some of it comes from the need to please you, dear readers. Some comes from the desire to bake everything I’ve pinned to my Pinterest boards. But the majority comes from my never-satisfied sweet tooth.

However…sometimes this urge hits and my pantry is nearly empty. And, in cases like yesterday, the snow was way too deep to run out to the grocery store. So I improvise…and come up with delicious treats like this:

photo

Sweetened condensed milk is one of those ingredients that I always seem to have on hand, but never actually use. In fact, it’s entirely possible that it’s the SAME can of milk rolling around in the pantry, since I can’t recall ever baking with it. But now, things are much different. Sweetened condensed milk is here to stay.

Take one can. Lie it on its side, fully submerged in a pot of water. Heat things up to a simmer, and leave it alone for 2 hours. Take it out, let the can cool off for awhile, then crack it open. The result?

Thick, sticky, beautiful caramel. Perfect for swirling, dunking, or licking from a spoon. And then, layer it on top of these cupcakes.

Empty-Pantry Chocolate Cupcakes

1 1/2 cups all-purpose flour
3/4 cup sugar
1/4 cup cocoa powder
1 teaspoon baking soda
1/2 teaspoon salt
5 tablespoons vegetable oil
1 tablespoon white vinegar
1 teaspoon pure vanilla extract
1 1/4 cups water (or brewed coffee)

Whisk all dry ingredients together in a bowl until fully incorporated. Add wet ingredients, stir until combined, and pour into greased or lined cupcake tins. Bake at 350 degrees for 20 minutes. Let cool, then top with caramel, frosting, or nothing at all.

Virtual Cookie Swap: the Recipes (pt 2)

Welcome back to the second installment of our Virtual Cookie Swap! These recipes all look delicious; many thanks to our fantastic contributors. Happy baking!

Chocolate-Peppermint Cookies
from my dear friend Roslyn
Image
Ingredients:

1 cup all-purpose flour, plus more for surface
1/2 cup unsweetened Dutch-process cocoa powder
1/2 teaspoon baking soda
1/2 teaspoon baking powder
1/2 teaspoon salt
2 1/2 ounces (5 tablespoons) unsalted butter, softened
3/4 cup sugar
1 large egg
1 large egg yolk
3/4 teaspoon pure peppermint extract
8 large candy canes or 30 peppermint candies, crushed
2 pounds white chocolate, coarsely chopped

Preheat oven to 325 degrees. Sift flour, cocoa powder, baking soda, baking powder, and salt into a bowl. Beat butter and sugar with a mixer on medium-high speed for 1 minute. Reduce speed to medium-low, and add egg, then yolk, beating well after each addition. Beat in peppermint extract. Slowly add flour mixture, and beat until just incorporated. Shape dough into 2 disks, wrap each in plastic, and refrigerate until firm, at least 1 hour (or up to 2 days).
Roll out 1 disk of dough on a lightly floured surface to 1/8-inch thickness. Freeze until firm, about 15 minutes. Using a 2-inch round cutter, cut out circles, and place 1 inch apart on parchment-lined baking sheets. Roll and cut scraps once. Freeze cookies until firm, about 15 minutes. Repeat with remaining disk.
Bake until cookies are dry to the touch, about 12 minutes. Transfer parchment, with cookies, to wire racks, and let cool. (Undecorated cookies will keep, covered, for up to 3 days.)
Sift crushed candy, and separate larger pieces from dust, reserving both. Melt chocolate in a heatproof bowl set over a pot of gently simmering water. Remove from heat. Dunk cookies into melted chocolate. Using a fork, turn to coat, let excess drip off, and gently scrape bottom against edge of bowl. Place on parchment-lined baking sheets, and sprinkle 1/4 teaspoon of either candy pieces or dust on top. Repeat, sprinkling half the cookies with pieces and the rest with dust. Refrigerate until set, up to 3 hours. Decorated cookies are best served the same day.


Peanut Butter Blossoms
from Gypsy Mama’s Journey

Image

Ingredients

1/2 cup white sugar
1 cup packed brown sugar
1 cup creamy peanut butter
1 cup butter, softened
2 eggs
3 cups flour
1 1/2 tsp baking soda
1 tsp baking powder
about 7 dozen Hershey’s Kisses (or chocolate macaroons)

Heat oven to 375°F. In large bowl, beat 1/2 cup granulated sugar, the brown sugar, peanut butter, butter and eggs with electric mixer on medium speed, or mix with spoon. Stir in flour, baking soda and baking powder.
Shape dough into 1-inch balls; roll in additional granulated sugar. Place about 2 inches apart on ungreased cookie sheet.
Bake 8 to 10 minutes or until edges are light brown. Immediately press 1 chocolate candy in center of each cookie. Remove from cookie sheet to wire rack.


Gingerbread
from Luna at The Moon on a Stick

notes in italic are Luna’s additions to the recipeImage

Ingredients:

1 1/2 lbs plain flour (6 cups)
1 tablespoon bicarbonate of soda (baking soda)
1/2 teaspoon of salt
2 teaspoons of ground ginger
2 teaspoons cinnamon (I prefer this measurement of cinnamon and ginger but for more gingery gingerbread you can put in more ginger and less cinnamon)
1/2 teaspoon each of nutmeg and ground cloves
1/4 teaspoon of ground cardamom (I grind the cardamom and the cloves myself in a pestle and mortar and I use fresh grated nutmeg, a few grates rather than measuring with a teaspoon)
1/2 teaspoon of vanilla essence
4 oz butter (1/2 cup)
8 oz soft brown sugar (1 cup)
2 tablespoons golden syrup
2 tablespoons black treacle
2 tablespoons evaporated milk
juice and zested rind of one orange and one lemon (my recipe says a little juice, but as I don’t know what that means I put the lot in, if the dough is still too wet to handle just add a little more flour, you also need a little extra flour to dust as you roll out any way. It is better to have a slightly too wet mixture than too dry as you can add more flour more easily than making it wetter in my experience. Also the dough firms up the more you roll it out)

Sift the flour (I don’t bother sifting and it always works fine!) with the soda, salt and spices into a large mixing bowl and gently combine.
Place the butter, sugar, syrup, treacle, essence, rind and juice into a saucepan and gently heat until sugar is dissolved. Don’t let it boil. Allow to cool and then mix into the flour with enough evaporated milk to make a dough you can handle. Chill for half an hour, wrapped in clingfilm, in the fridge.
Pre-heat the oven to 325 (mark 3 or 160) and grease a couple of baking trays/sheets.
On a floured surface roll out the mixture to about 1/4 inch thick (Play around with this, a thinner roll out makes a crunchier gingerbread, I personally go for thicker roll out which makes it softer and chewier). Use a shaped cutter to cut out your gingerbread pieces (again play around. smaller pieces are crunchier and larger ones softer, I like the larger ones but it is personal taste).
Place the shapes on the greased trays and bake for 10 – 15 mins (I have found 10 to be sufficient but I have a fan oven). Allow to cool slightly and then carefully lift onto cooling trays.
You can decorate these if you wish (personally I don’t feel the need to as they taste so amazing as they are).